How to Patch a Hole in the Wall: A Complete DIY Guide for Beginners
Introduction
Have you ever moved a picture frame only to find an ugly nail hole staring back at you? Or maybe your kid got a little too excited playing indoors and put a doorknob-sized hole in the hallway wall. Don’t worry – it happens to the best of us. The good news? You don’t need to be a professional contractor to fix it.
Learning how to patch a hole in the wall is one of those skills that every homeowner and renter should know. It saves money, makes your space look better, and gives you a great sense of accomplishment. Plus, it’s much easier than you might think.
I remember the first time I tried to patch a hole in my apartment wall. I made a complete mess. There was spackle on my clothes, on the floor, and somehow even on the ceiling. But after a few tries (and a lot of YouTube videos), I got the hang of it. Now I want to share what I’ve learned with you.
In this guide, I’ll walk you through everything you need to know about how to patch a hole in the wall. We’ll cover small nail holes, medium-sized dings, and even those larger holes that seem scary at first. By the time you finish reading, you’ll feel ready to grab your tools and get started. Let’s fix that wall together.
What You’ll Need Before You Start
Before we dive into the actual steps of how to patch a hole in the wall, let’s talk about supplies. Having the right tools makes all the difference. You don’t need anything fancy – just basic items you can find at any hardware store.
For small holes, grab some spackling compound. This is a lightweight paste that fills tiny imperfections. You’ll also need a putty knife, which is a flat metal tool that spreads the spackle smoothly. Sandpaper (fine-grit works best) helps you smooth things out later. And don’t forget a damp cloth for cleaning up dust.
For medium holes, you might want joint compound instead of spackle. It’s similar but works better for bigger areas. You’ll also need self-adhesive mesh tape. This stuff sticks to the wall and gives the compound something to grab onto. A wider putty knife helps cover more ground quickly.
Larger holes need extra supplies. You’ll need a drywall patch kit or a piece of drywall, some wood for backing, and drywall screws. A keyhole saw or drywall saw cuts through the wall cleanly. And safety glasses are smart – drywall dust gets everywhere.
The best part? Most of these supplies cost less than a pizza dinner. So you’re saving money by fixing things yourself. That’s a win-win in my book.
Safety First: Getting Ready to Work
Okay, I know safety talk isn’t the most exciting part of learning how to patch a hole in the wall, but trust me – it matters. A few simple steps keep you safe and make the job easier.
First, look at what’s behind the wall. Is there an electrical outlet nearby? Light switches? Pipes? You don’t want to accidentally cut into a wire or water line. If you’re working near outlets, turn off the power to that room at the breaker box. It takes two minutes and gives you peace of mind.
Wear a dust mask when you start sanding. Drywall dust is super fine and gets into your lungs easily. It’s not dangerous in small amounts, but why breathe it in if you don’t have to? Safety glasses also help when you’re cutting into the wall. Little bits of drywall can fly up and get in your eyes.
Cover your floors with a drop cloth or old sheets. Drywall compound can stain carpets and hardwood floors. Even if you’re careful, accidents happen. I learned this the hard way when I dropped a glob of spackle on my mom’s white rug. She still reminds me about it every Thanksgiving.
Ventilate the room by opening a window. Some compounds have a slight smell, and fresh air always helps. Plus, it helps the patching material dry faster. Good airflow speeds up the whole process.
Fixing Small Nail Holes and Dings
Let’s start with the easiest repair. Small nail holes and minor dings are super simple to fix. This is where most people begin learning how to patch a hole in the wall, and it’s a great confidence builder.
Grab your spackling compound and putty knife. Scoop a tiny amount onto the knife tip. Don’t go crazy – you can always add more, but taking away extra is messy. Spread the spackle over the hole, pressing gently so it fills the space completely. Move the knife in one smooth motion to scrape away the excess.
Let it dry completely. Check the label on your spackle – most dry in about an hour, but some take longer. Be patient. I’ve ruined plenty of repairs by rushing this step. When it’s dry, sand the area lightly with fine-grit sandpaper. The goal is to make it perfectly smooth and level with the surrounding wall.
Wipe away the dust with a damp cloth. Now look at your work. Can you still see the hole? If yes, apply another thin layer and repeat the process. Sometimes small holes need two coats, especially if they were deep.
The final step is painting. Touch up the area with matching paint. If you don’t have the original paint, take a chip to the hardware store. They can color-match it for you. And just like that, the hole disappears. Pretty cool, right?
Dealing with Medium-Sized Holes
Medium holes – anything bigger than a nail hole but smaller than a baseball – need a slightly different approach. These often happen when you remove anchors, shelves, or curtain rods. The good news? You already know the basics of how to patch a hole in the wall. Now we just level up a bit.
Start by cleaning the edges of the hole. Remove any loose drywall paper or chunks that might fall off later. A utility knife works great for this. You want a clean opening with no ragged edges.
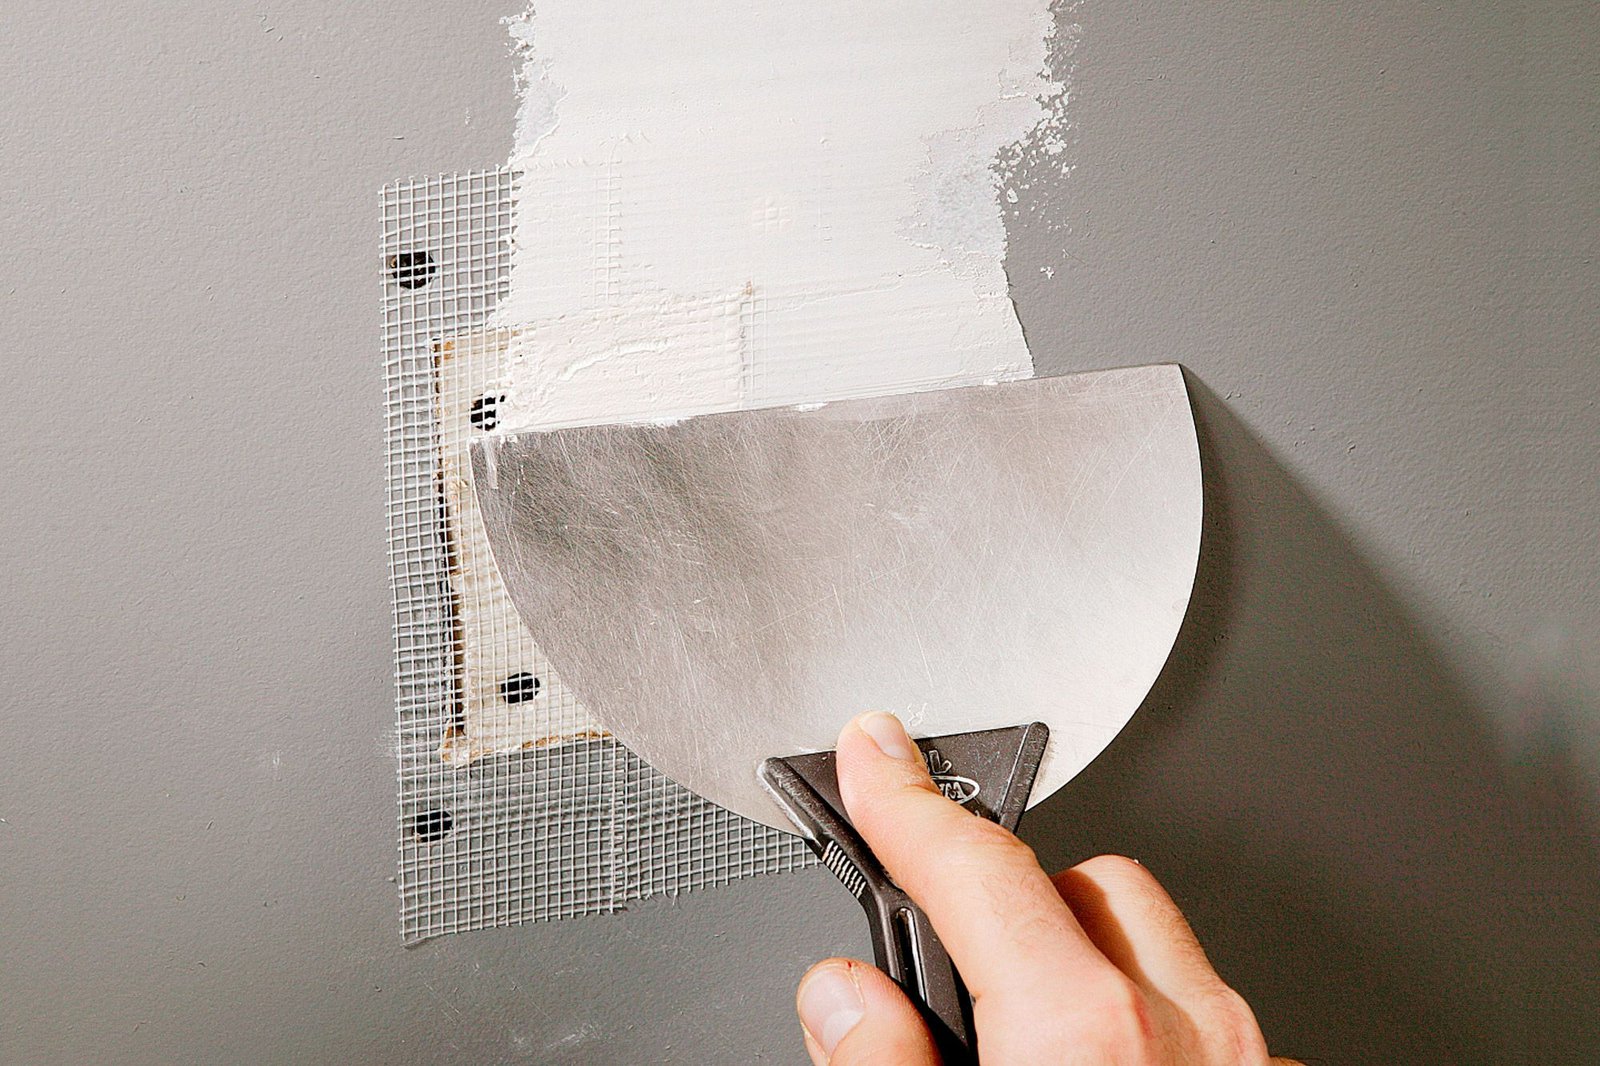
Now take your self-adhesive mesh tape and cut a piece big enough to cover the hole plus an inch on each side. Stick it right over the hole. The mesh gives the joint compound something to hold onto and prevents cracking later. Press it down firmly so it sticks well.
Mix your joint compound if needed (some come premixed). Using a putty knife, spread a thin layer over the tape. Don’t pile it on thick – thin layers dry better and look smoother. Cover the tape completely, then feather the edges outward so they blend with the wall.
Let it dry overnight if possible. Joint compound takes longer than spackle. When it’s dry, sand gently. You’ll probably need a second coat. Apply another thin layer, let it dry, and sand again. The hole should disappear under smooth, flat compound.
Prime the area before painting. Joint compound soaks up paint differently than drywall, so primer creates a uniform surface. Then paint to match. Stand back and admire your work. You just saved yourself a service call.
Fixing Large Holes Like a Pro
Large holes look scary, but they’re totally fixable. Maybe you had to access pipes behind the wall, or maybe someone got a little too enthusiastic during a dance party. Whatever happened, you can learn how to patch a hole in the wall even when it’s big.
For holes bigger than about six inches, you’ll need to install a new piece of drywall. First, use a pencil and straightedge to draw a rectangle around the hole. Make it neat and square. Then cut along your lines with a drywall saw. You’re basically making the hole into a perfect shape that’s easier to patch.
Now cut a patch piece from new drywall. It should fit exactly into the opening you created. Measure carefully – a snug fit works best. You’ll also need backing behind the wall to screw your patch into. Cut two pieces of wood (like furring strips) longer than the hole height. Insert them into the opening and screw them to the existing drywall through the front.
Place your drywall patch into the hole. Screw it into the wood backing you installed. The screw heads should sit just below the surface, not sticking out. Now you have a solid patch in place.
Cover the seams with mesh tape, then apply joint compound just like we did for medium holes. You’ll need multiple coats, letting each dry completely. Sand between coats. The goal is to make the patch invisible. It takes patience, but the result looks professional.
Sanding Techniques for a Smooth Finish
Sanding might not be exciting, but it’s crucial when you learn how to patch a hole in the wall. Good sanding separates an amateur repair from a professional-looking one. Let’s get it right.
Always use fine-grit sandpaper – around 150 to 220 grit works well. Coarser paper leaves scratches you’ll have to fix later. Wrap the sandpaper around a sanding block or use a sanding sponge. This keeps pressure even and helps you avoid digging grooves into the compound.
Sand in a circular motion, not back and forth. Circles blend the edges better. Check your progress often by running your hand over the surface. You’re feeling for smoothness, not just looking. Your fingers detect imperfections your eyes might miss.
Don’t oversand. Once the area feels smooth and blends with the wall, stop. If you sand too much, you’ll expose the tape or create dips that need filling again. Light pressure works best – let the sandpaper do the work.
Wear that dust mask we talked about. Sanding creates fine powder that floats in the air. It settles everywhere, so cover nearby furniture. After sanding, wipe the area with a tack cloth or damp rag. The surface needs to be clean before painting.
Sometimes you’ll sand and discover a low spot. That’s okay. Just apply another thin coat of compound and sand again when dry. Multiple thin coats always look better than one thick, lumpy coat.
/Bhg-how-to-patch-dry-wall-hero-2431_ErCJ7v2pKcVADoq5rBc19m-9bc6054b40c84af4bd3ba2b19b3693b9.jpg)
Priming and Painting Your Repaired Wall
You’ve done the hard work of learning how to patch a hole in the wall. Now comes the satisfying part – making it look perfect again. Priming and painting might seem straightforward, but a few tips help everything go smoothly.
Primer is essential, even if you’re using paint that claims to be “paint and primer in one.” Fresh joint compound is porous and absorbs paint unevenly. Without primer, your repair will look dull and different from the surrounding wall. Apply a thin coat of primer over the patched area, extending a few inches beyond the repair.
Let the primer dry completely. It usually takes an hour or two. Now look at the area in different lighting. Can you still see the patch outline? If yes, apply another coat of primer. Sometimes thirsty compound needs extra sealing.
Now for paint. If you have the original paint can, great. Stir it well before using. If you don’t have the original, get a color match sample made. Paint the entire wall from corner to corner, not just the patched spot. Why? Because touching up just the repair often leaves a noticeable patch of fresh paint. Painting the whole wall guarantees everything matches perfectly.
Use a small roller for smooth walls or a brush for textured surfaces. Apply thin, even coats. Two coats usually do the trick. Let the first coat dry before adding the second. When you’re done, step back and admire your work. The hole is gone, and your wall looks brand new.
Matching Wall Texture Like a Pro
Here’s something that trips up many DIYers. You’ve mastered how to patch a hole in the wall, but now the repair looks too smooth compared to your textured wall. Don’t panic – matching texture is easier than you think.
First, identify your wall texture type. Orange peel looks like tiny bumps. Knockdown texture has flattened peaks. Popcorn texture is bumpy and heavy. Skip trowel texture looks like gentle arcs. Look closely at your wall to see what you’re matching.
For orange peel texture, you can buy spray texture in a can. Practice on cardboard first to get the hang of it. Hold the can back about 12 inches and spray in light, sweeping motions. Let it dry slightly, then check if it matches. Adjust your technique until it looks right.
Knockdown texture needs two steps. First, spray or dab on joint compound in random patterns. Then, while it’s still wet, lightly drag a knockdown knife or wide putty knife over the peaks. This flattens them slightly, creating that characteristic look.
For heavy textures like popcorn, you might need specialized spray products. These contain styrofoam bits that create the bumpy surface. Again, practice first. And remember – popcorn texture often contains asbestos in older homes. If your house was built before 1980, test before sanding or disturbing it.
Skip trowel texture takes practice. Apply joint compound thinly with a trowel, then skip the trowel across it to create peaks. It’s an art, so be patient. You can always sand and try again.
Common Mistakes to Avoid
Even after learning how to patch a hole in the wall, mistakes happen. I’ve made every single one on this list. Learn from my errors and save yourself some frustration.
Skipping the primer is mistake number one. I know, I mentioned it already, but it’s that important. Paint soaks into fresh compound differently than drywall, creating a dull spot that screams “repair.” Just prime it.
Using too much compound at once causes cracking and shrinkage. Thin layers dry faster and stronger. Build up gradually instead of piling it on. Your patience will pay off.
Not feathering edges leaves a raised ridge around your repair. Always extend compound beyond the repair area and blend it thinner toward the edges. Think of it as disappearing into the wall, not sitting on top of it.
Forgetting to clean dust before painting ruins adhesion. Paint needs a clean surface to stick to. Wipe thoroughly after sanding. Use a tack cloth if you have one – they’re designed to pick up fine particles.
Rushing the drying time creates soft spots that never fully harden. Follow the manufacturer’s drying recommendations. If it says 24 hours, wait 24 hours. Your wall will thank you.
Mismatching texture stands out like a sore thumb. Take time to practice matching techniques before applying them to your repair. Your eye will notice even small differences, so get it right.
When to Call a Professional
Learning how to patch a hole in the wall empowers you to handle most repairs yourself. But sometimes, calling a pro makes more sense. Knowing your limits is part of being a smart DIYer.
Water damage needs professional attention. If your hole came from a leak, the damage might extend deeper than you see. Mold could be growing inside the wall. A professional can assess and fix the underlying problem, not just patch the surface.
Large holes covering multiple feet might be too much for beginners. While you can patch almost any size hole, very large repairs require more skill and experience. If the project feels overwhelming, get a quote from a drywall contractor.
Electrical or plumbing issues behind the wall require licensed pros. If your hole exposed wiring or pipes, don’t just patch over them. Have everything inspected and repaired properly first. Safety comes before savings.
Textured ceilings, especially popcorn, often contain asbestos in older homes. Disturbing them releases dangerous fibers. Professional abatement is expensive but necessary for safety. Don’t take chances with asbestos.
Repeated problems in the same spot might indicate structural issues. If you keep patching the same area, something else is wrong. A professional can diagnose and fix the root cause permanently.
Remember, hiring a professional isn’t failure. It’s smart decision-making. You’ve still gained valuable skills for future projects.
Tools Every Homeowner Should Keep Handy
Now that you know how to patch a hole in the wall, let’s talk about building your toolkit. Having the right supplies ready means you can fix holes as soon as they happen, before they get worse.
A good putty knife set is essential. Get a small one (1-2 inches) for nail holes and a larger one (6 inches) for bigger repairs. Stainless steel cleans up easily and won’t rust. Spend a few extra dollars for quality – cheap ones bend and frustrate you.
Keep spackle and joint compound in your supply cabinet. Spackle works for quick small fixes. Joint compound handles bigger jobs. Both have long shelf lives if stored properly. Check dates occasionally and replace dried-out products.
Self-adhesive mesh tape takes up almost no space but saves the day for medium holes. A small roll lasts for years. Add fine-grit sandpaper and a sanding sponge to your collection. You’ll use them constantly.
A drywall saw costs little and cuts through wallboard like butter. Even if you rarely need it, you’ll be glad you have it when a large hole appears. Add a utility knife and extra blades – they’re useful for countless tasks around the house.
Don’t forget safety gear. Dust masks, safety glasses, and disposable gloves protect you during every repair. Store them with your tools so they’re always available when you start a project.
Paint supplies matter too. Keep a small container of primer and touch-up paint for each room. Label them clearly with the room name and date. Future you will appreciate this organization.
Frequently Asked Questions
How long does drywall compound take to dry?
Drying time varies by product. Lightweight spackle dries in 1-2 hours. Joint compound needs 24 hours between coats. Check the label on your specific product. Humidity and temperature affect drying too. Wait longer in damp conditions.
Can I patch a hole without tape?
For tiny nail holes, tape isn’t necessary. For anything larger than a pencil, use tape. It prevents cracks from forming along the seam. Self-adhesive mesh tape is easiest for beginners. Paper tape works great too but needs a thin layer of compound underneath.
Why does my patch keep cracking?
Cracking usually means layers were too thick, or drying happened too fast. Apply thinner coats and let each dry completely. Also check if the hole moves – flexing causes cracks. Make sure the repair area is stable before patching.
Do I need to prime before painting?
Yes, always prime. Joint compound absorbs paint unevenly. Primer seals the surface so paint looks uniform. It’s an extra step, but it makes the difference between a visible repair and an invisible one.
What’s the best way to match paint?
Take a chip of paint to the hardware store for color matching. Cut a small piece from an inconspicuous area, like inside a closet. Store color matches can be remarkably accurate. For best results, paint the entire wall so sheen matches perfectly.
Can I patch a hole in textured walls?
Absolutely. Patch the hole first, then match the texture afterward. Practice matching on cardboard before applying to your wall. Take your time – texture matching takes practice but creates professional results.
Conclusion
You did it. You’ve learned how to patch a hole in the wall from start to finish. Small nail holes, medium dings, and even those scary large openings – you now have the skills to handle them all. That’s pretty awesome.
Remember that every repair gets easier with practice. Your first attempt might not look perfect, and that’s completely okay. Mine certainly didn’t. But each time you patch a hole, you build confidence and skill. Before long, you’ll be the friend that everyone calls for home repair advice.
The tools and materials cost little compared to hiring help. Plus, there’s something deeply satisfying about fixing things with your own hands. You’re not just repairing drywall – you’re taking control of your living space and making it truly yours.
So next time you spot a hole in your wall, don’t stress. Grab your putty knife, take a deep breath, and get to work. You’ve got this. And if you run into trouble, come back to this guide. I’m cheering for you and your perfectly patched walls.